
These days, it’s relatively easy to create a screencast tutorial video. With just a couple of tools, anyone can record a video of their screen and upload it to YouTube. But if you want to create effective instructional videos people will actually watch and share… well, that takes a little more effort.
If you’ve watched many screencast videos, you’ve probably noticed they’re usually created by an ‘expert’ who’s just rapidly clicking through screens and checkboxes in a dizzying blur, while using confusing tech jargon and trying to impress you with everything that’s in their head. They may be an expert user of the software, but they’re certainly not focused on education — on making sure that you, the viewer, can actually learn.
Since 2008, I’ve created more than 1,500 screencast tutorial videos for my own WordPress tutorial series, and clients like Automattic, GoDaddy, WooCommerce, Namecheap, and dozens of others.
In this guide, I’ll walk you through the tools and techniques I’ve learned so you can create screencast learning videos that will actually help your audience learn. Then, I’ll include some bonus tips for how you can improve your screencasts so people will actually watch and share your videos.
Before we dive in, let me clarify what we’re talking about when we say, “screencasts”.
What is a screencast?
Simply put, a screencast is a digital recording of your computer screen, usually accompanied by audio narration. Screencasts are great for showing viewers the best way to use an online application, or software application, step-by-step.
Screencast videos are an excellent way to introduce your product to new customers, or help existing customers get up to speed with your product. And that translates to fewer calls and emails for your customer support team.
Screencasts can also be used to help a new employee get up to speed more quickly, without requiring another, more veteran employee spend their valuable time teaching a new hire the basics.
If you find that you’re often repeating the same instructional content over and over again, it might be time to create a screencast. Record a screencast video once, and then share it with your employees or customers.
Screencasts are perfect for online learning, because they enable your audience to watch and learn whenever it’s most convenient for their schedule. Plus, they can return at any time for a quick refresher.

What makes an effective screencast?
A well-crafted screencast guides the viewer, step-by-step through the best way to achieve a specific goal, task, or outcome — clearly and concisely.
- No more than five minutes in length.
Chances are, if you can’t cover the material in less than five minutes, you’re trying to cover too much ground. - Clearly articulates the goal or objective.
What is the problem your audience faces? And what is the specific objective or goal of the tutorial? - Both conversational and educational.
Good narration sounds natural and conversational, not like someone reading a book aloud. - Easy to follow, step-by-step instructions.
What are the specific steps required to accomplish the task? Nothing more, nothing less. - Showcases the product. No distractions.
No distracting desktops background, notifications, random cursor movements, ‘uhs’ or ‘ums.’
Alright, now that we’re clear on what screencasts are and how you might use them, let’s dive in!
3 Tools You’ll Need to Create a Screencast
It’s worth noting that you don’t need expensive equipment to create great screencasts. You can start with basic, inexpensive tools, and then upgrade later. That’s why I’ll recommend multiple options for each of the tools below.
Here are the three tools you’ll need in order to create great screencasts:
1. Screen Recording Software
You’ll need software to record your on-screen actions and accompanying narration, then export and share that video with others.
If you use a Mac, you’ll find that you can create decent screen recordings using the free QuickTime Player application. Just launch the app, then choose File > New Screen Recording and click the red button to begin recording your screen actions. You can record either your full screen, or just a portion of your screen.
When you’re finished recording, simply save your video to your computer, or share it via email, YouTube, Vimeo, or any of the other built-in destinations.
While this method is fine for creating very simple screencasts, you’ll soon discover that the editing tools are quite rudimentary, if not downright frustrating. So, when you’re ready to begin creating more professional screencasts, you’ll want to invest in a proper screen recording program like Camtasia or my personal favorite, ScreenFlow.
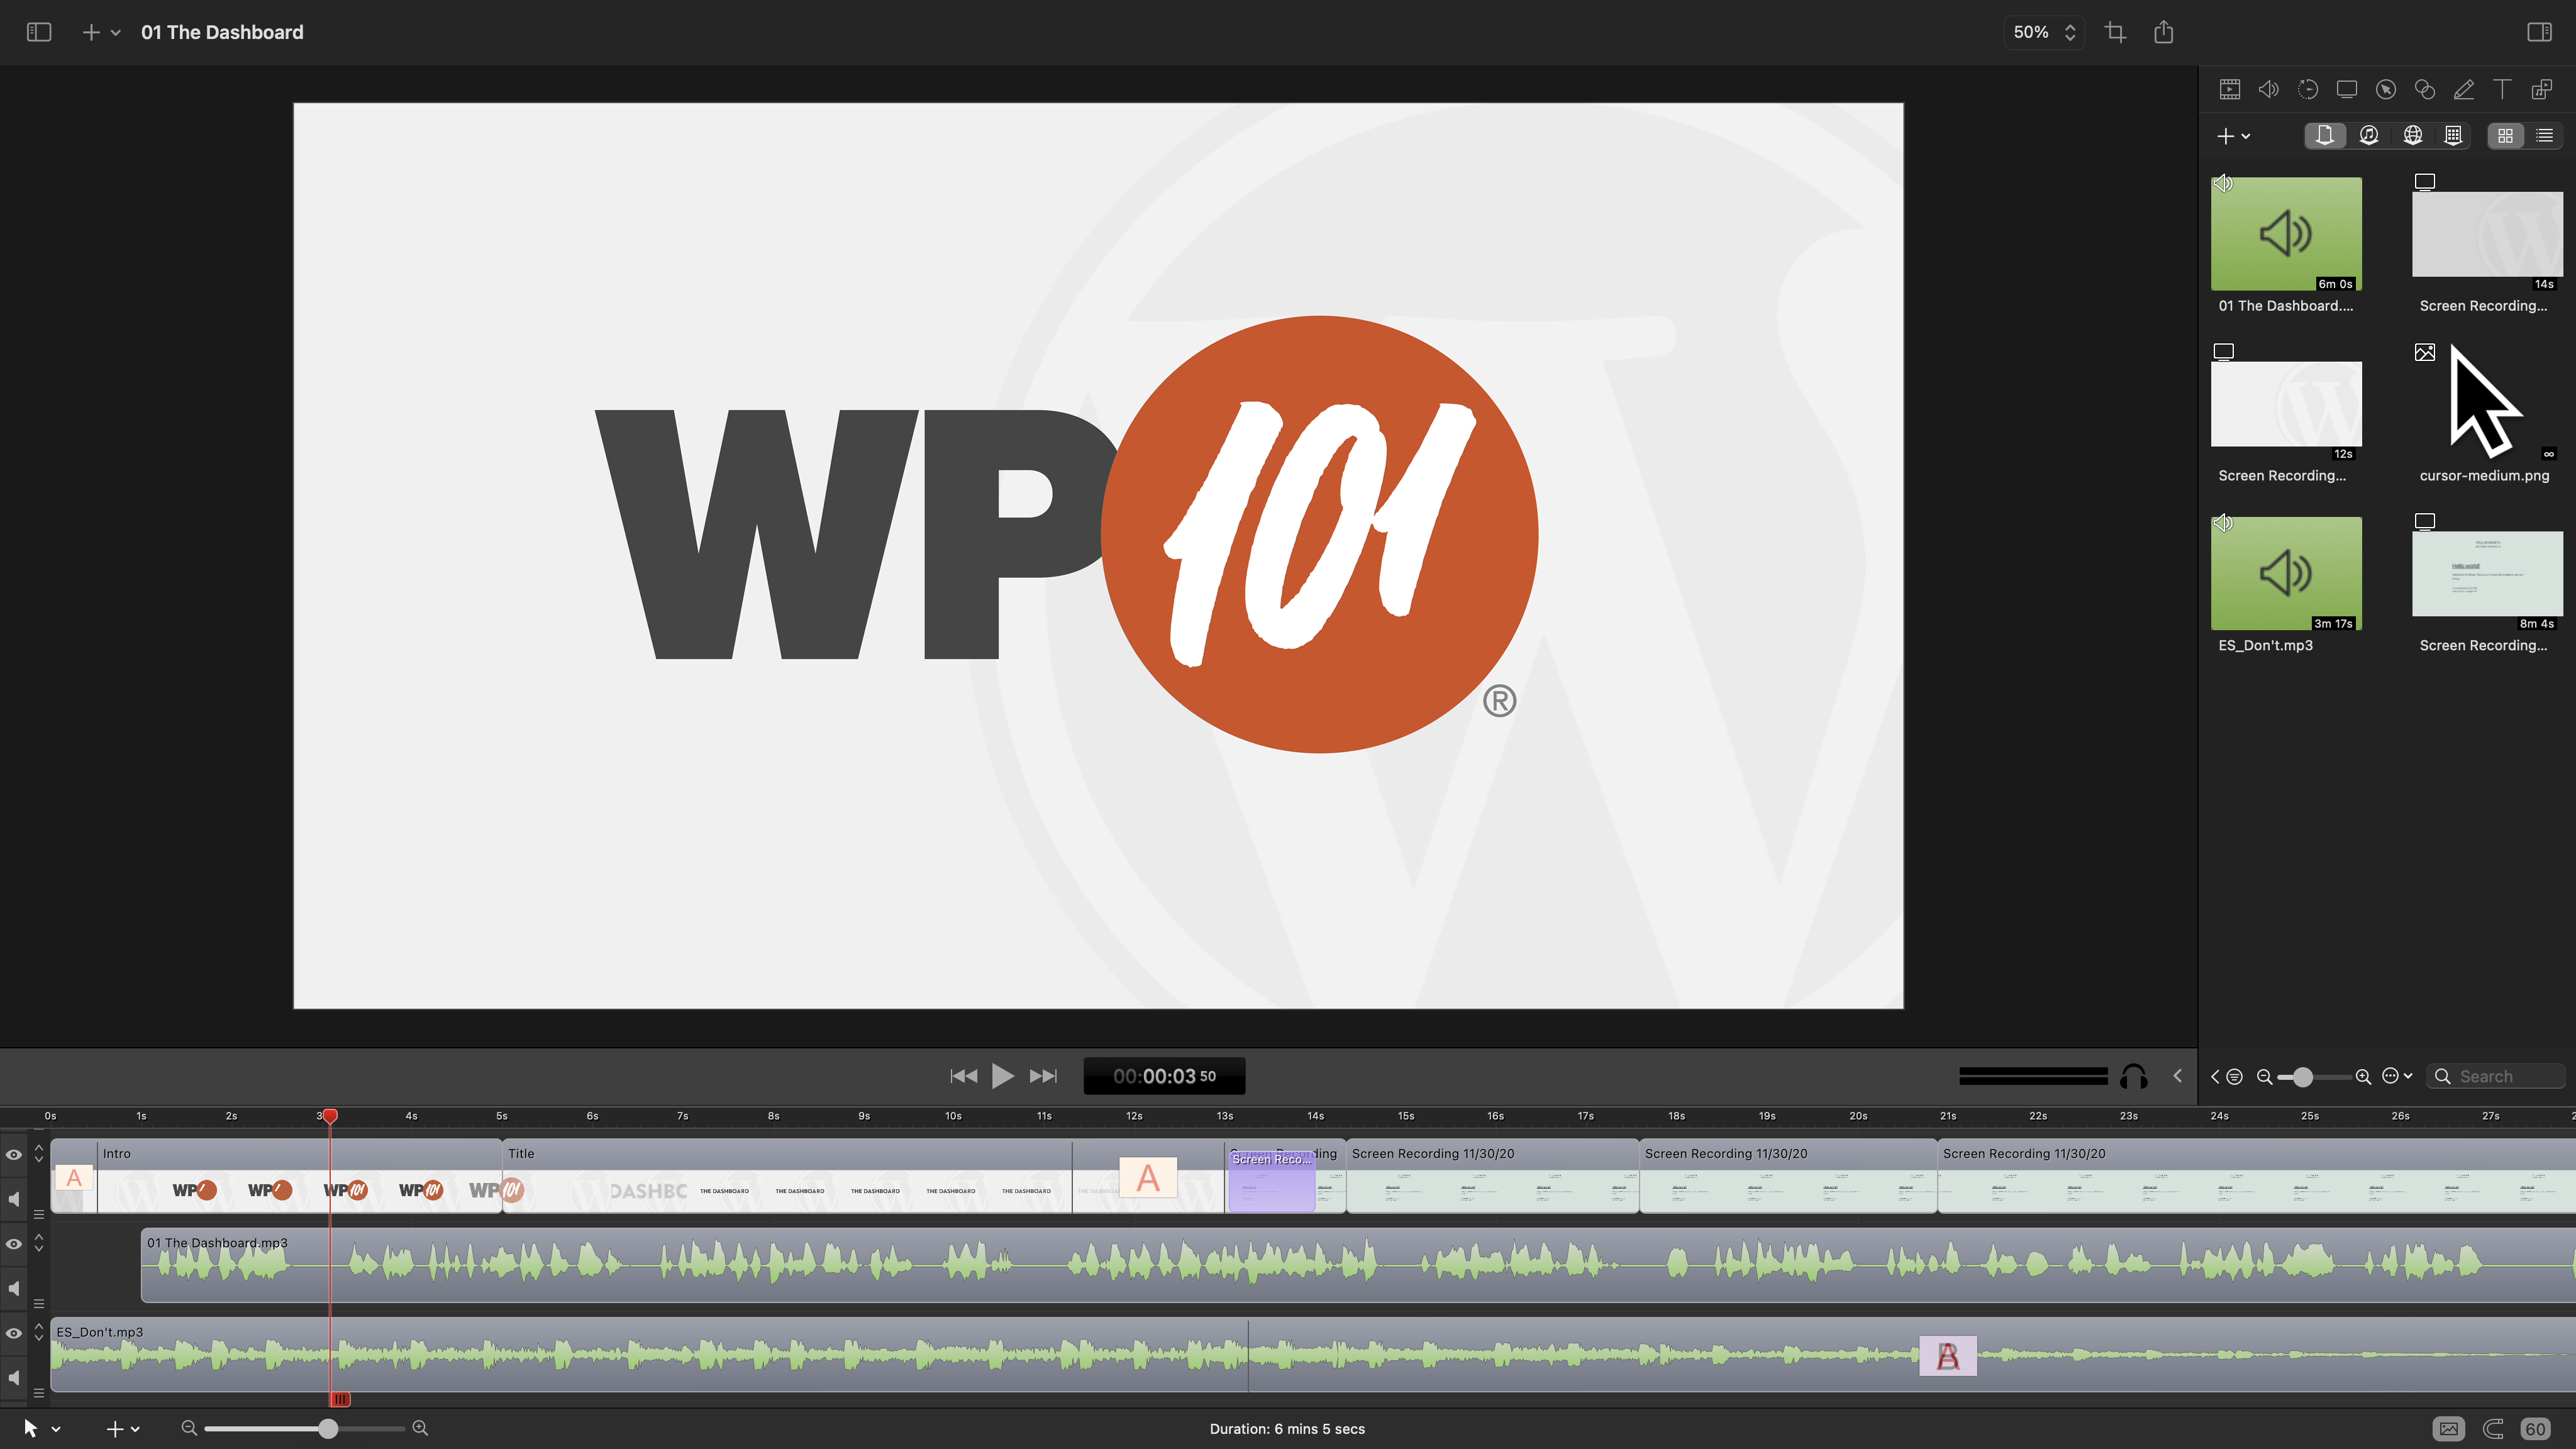
Camtasia and ScreenFlow cost roughly the same, offer similar features, and function in pretty much the same way. But each application has a slightly different user interface and editing tools. You may find that you simply prefer one over the other. Personally, I prefer the overall experience of ScreenFlow, including the editing interface and the powerful export tools.

My favorite feature in ScreenFlow is the ability to publish directly to YouTube or Vimeo with just a single click. This eliminates the time-consuming process of exporting, then converting the final video into a suitable format, and guessing at a suitable data rate, final size, or frame rate. Best of all, the final video is of noticeably higher quality when exported directly to the video hosting service.
Q: What screen recording software do you use and recommend?
A: Hands-down, ScreenFlow. On a PC? Camtasia is your only choice.
2. A Microphone for Recording Narration
Believe it or not, the first thing people will notice about your video is the quality of the audio.
Don’t use your computer’s built-in microphone to record your narration. The audio will be muffled or unclear, filled with distracting background noises, echo from the room, or worse… the clatter and thud of your fingers on the keyboard.
After the screen recording software itself, the next most important piece of equipment is a high-quality microphone.
Start with a USB Microphone.
If you’re just starting out, I’d recommend you begin with a USB microphone. They’re affordable and provide decent audio quality. One of the biggest advantages of using a USB microphone is that they require no additional hardware. Simply plug the USB cable directly into your computer, and you’re ready to start recording!
Now, I’ve purchased and tested dozens of microphones over the years. I have a background in professional audio engineering, and I really enjoy testing new microphones. In my tests, the Blue Yeti continues to be one of the best entry-level USB microphones on the market. It normally retails for $129, but you can often find it on sale for even less.
Ready to level up? Step up to the Shure MV7.
But if your budget permits, I’d highly recommend the excellent Shure MV7. It just may be the last mic you ever need to buy.

The Shure MV7 is basically a ‘junior’ version of the highly popular Shure SM7B, which you’ve probably seen in dozens of podcasts. And in my tests, it sounds very similar, despite costing $150 less. But unlike the popular SM7B, the MV7 has both a USB connection and an XLR microphone connection. That means you can use it out of the box as a simple USB microphone, or with an audio interface.
But what makes the Shure SM7 so great is the included software. MOTIV™ is a lightweight desktop app that powers the Shure MV7. It has two modes: Auto Level and Manual Mode.
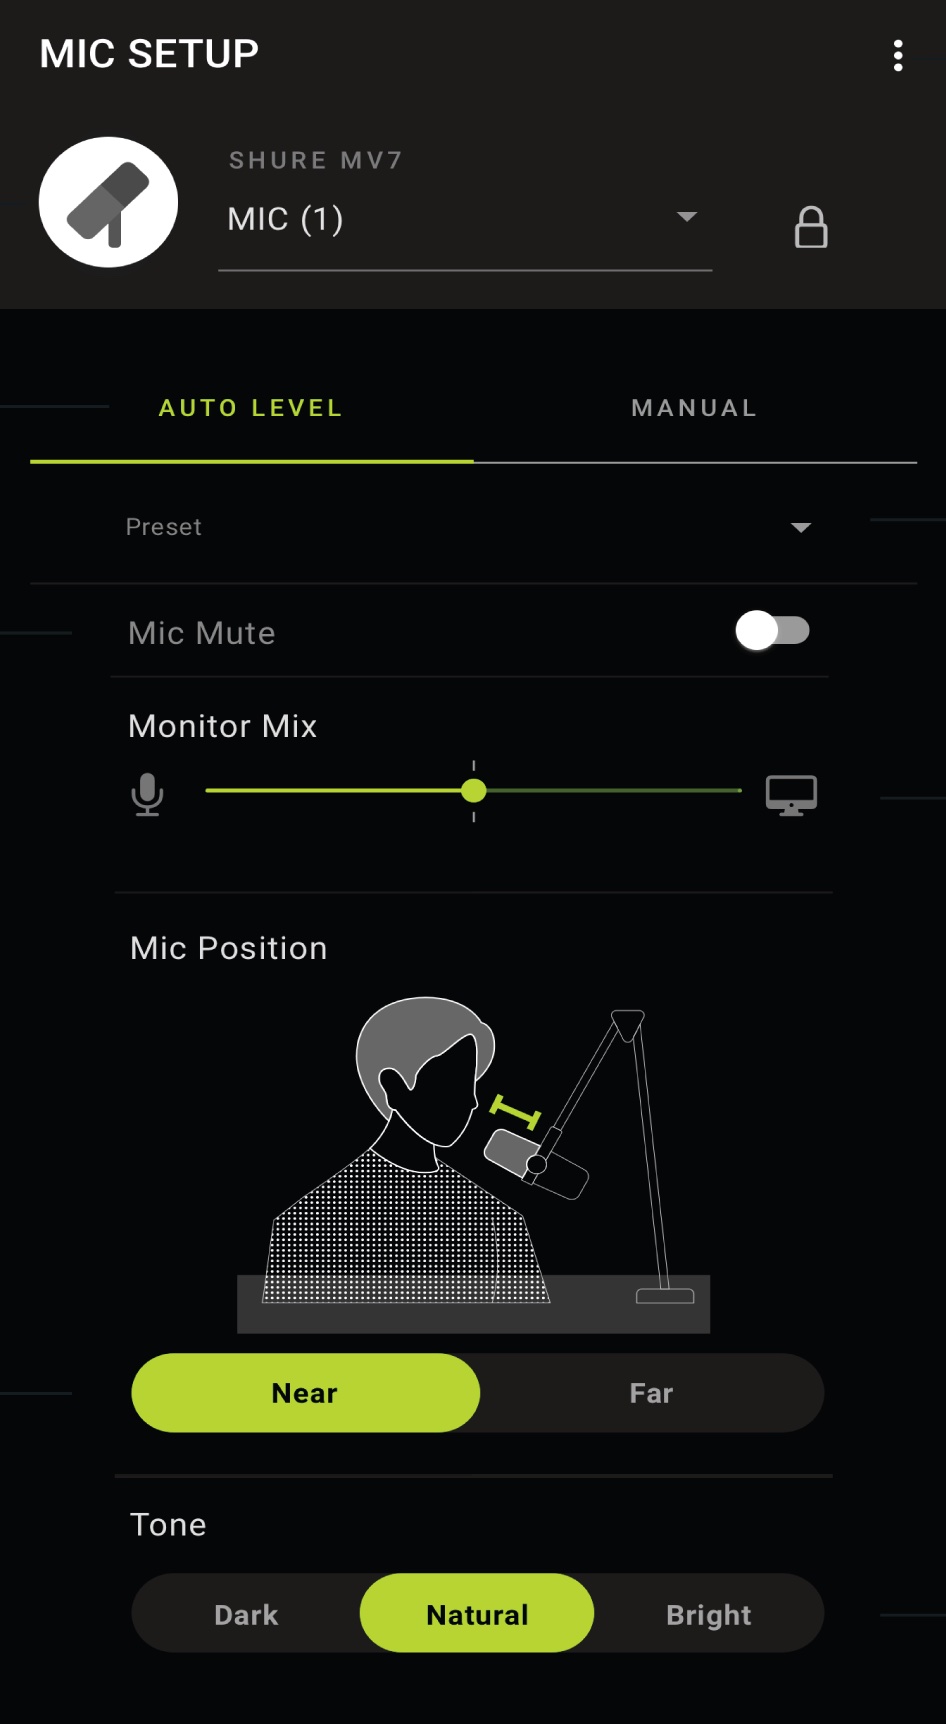

In Auto Level Mode, you just set the mic position (near or far), and the tone you want (dark, natural, or bright). That’s it. The software does the rest. It automatically adjusts the volume, EQ, and more to make your voice sound the best.
In Manual Mode, you can adjust the mic gain, monitor mix, EQ, limiter, compressor, and more. So you’ll have as much control over the quality of your narration as you want.
At $249, the Shure MV7 is a fantastic microphone you can use to record professional-quality voice-overs for your screencast videos, create a podcast, or sound more professional on webinars and video calls. It may be the last mic you ever need to buy!
Q: What microphone do you recommend for screencasts?
Good: If you’re on a limited budget, start with the Blue Yeti.
Better: When you’re ready to step up your game, you’ll want a dynamic mic like the Shure MV7.
3. A Quiet Place to Record
Unless you have access to a professional recording studio, you’ll likely find yourself recording screencasts in your office or perhaps a semi-quiet room in your house. But, as you’ve probably already noticed, your microphone still picks up distracting background noise and echo from the room itself. Nobody wants to hear your phone ringing or your dog barking in the background of your video.
So, how do you soundproof your recording area to eliminate room noise and pesky echo?
Professional voice over artists use expensive, purpose-built vocal booths, which are insulated and completely soundproof. But you don’t have to spend a fortune to create a quiet environment for recording your own voice-overs.
A well-known hack used by many beginning voice over artists is to simply record in a clothes closet. No kidding.
The hanging clothes in a tiny space dampen and absorb the sound of your voice, rather than reflecting it back into the microphone, virtually eliminating echo and creating an intimate, ‘up close’ sound.
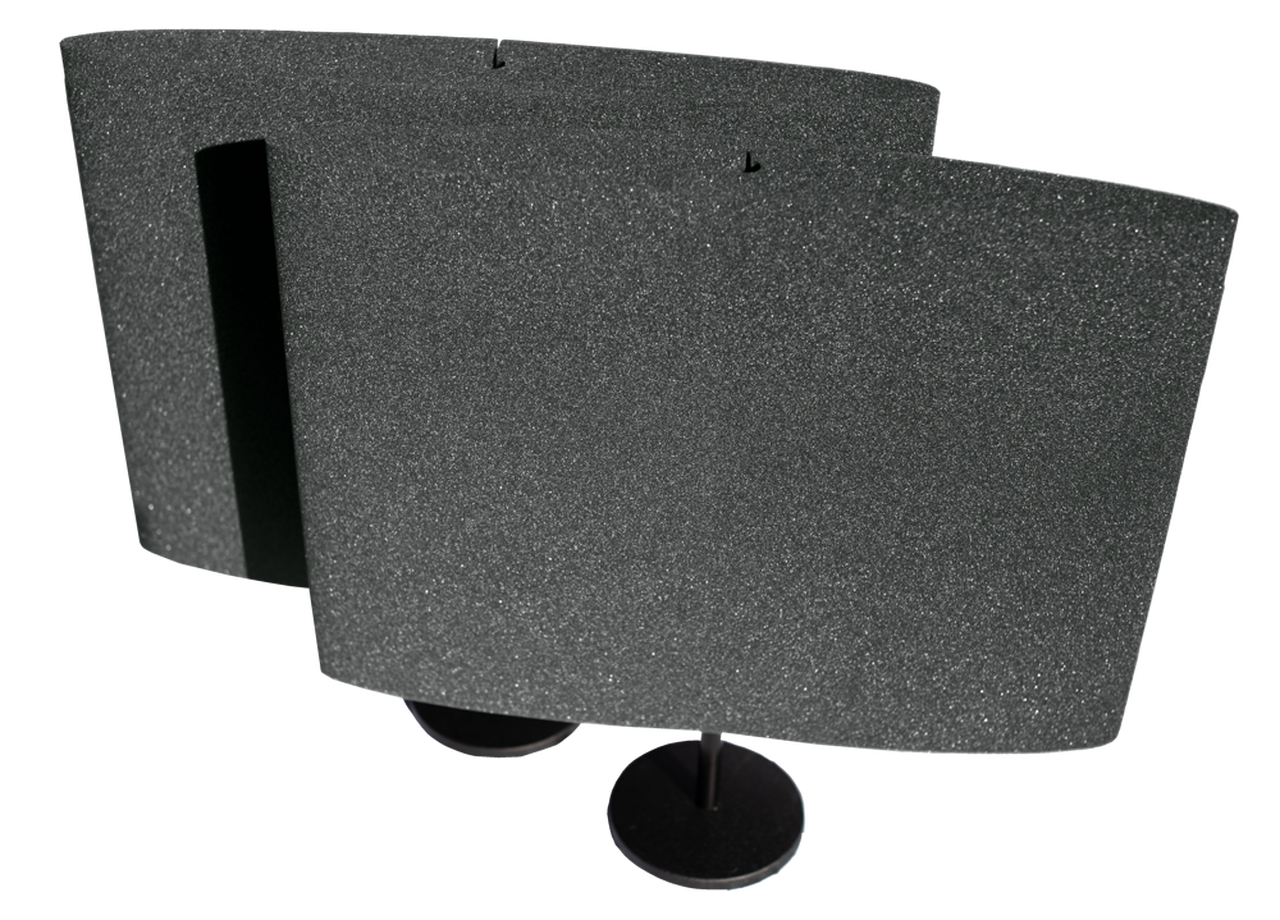
But, if you’re like me, you prefer to record at your desk. If so, buy two of these inexpensive DeskMAX panels by Auralex, and position one on either side of your computer and microphone. These do an amazing job of reducing room echo, and may be the only additional soundproofing you require.
Q: What’s the easiest way to reduce room echo and background noise while recording?
A: Purchase two DeskMAX panels, and position one on either side of your computer and or microphone. To go one step further, purchase two of these Sound Wall Panels and position them directly behind you to create an excellent temporary vocal recording booth.
With these three tools, you’re ready to start recording. So let’s move on to the good stuff… how to actually create a screencast!
How to Create a Screencast Video
Broadly speaking, there are two methods for recording screencasts. The first is to simply hit “Record” in your screencast recording software and then record your screen actions while narrating at the same time. It’s easy and quick. But it often results in awkward pauses, or ‘uhs’ and ‘ums’ — because it’s difficult to concentrate equally on both the on-screen actions and also your narration.
That’s why I prefer a second, more strategic approach. I write a detailed, word-for-word script first, during a ‘dry-run.’ Then, I record the voice over or narration in Logic Pro (you could also use GarageBand), carefully inserting deliberate pauses where needed.
Next, I import that audio file into ScreenFlow, and then record my on-screen actions while simultaneously playing back the narration audio. This ensures that the narration is as clear and succinct as possible, and that the on-screen actions are perfectly synced to the instruction being presented.
Here’s the exact process I follow to create a screencast…
My 10 Steps to Create a Screencast
- First, collect any materials you want to include in the video. These might include a high-resolution logo file, as well as any existing pre-roll, intro/outro graphics, and/or music.
- Set up a fully functional local demo environment. I prefer to work from a local installation to ensure there are no unsightly delays or ‘spinning beach balls’ during recording due to Internet speed or server ‘hiccups.’
- Write a detailed, word-for-word script for the voice over/narration, alongside a description of what’s happening on-screen during each moment of the video. This helps to visualize the video before it’s created.
- Record the narration/voice over. Narration is the most important ingredient in a tutorial video. Strive for a conversational tone, as if you’re talking with your best friend.
- Export the final audio file, then import it into ScreenFlow. MP3 format is fine.
- Record the on-screen actions while simultaneously playing back the audio, if it helps. In ScreenFlow, you can hit, “Record,” then immediately hit the play button in your project to begin playing the narration, while you record your screen actions. This enables you to perfectly time your on-screen actions to align with your narration.
- Optionally, create an intro and outro. (See more details below.) Even a simple intro that includes your logo and a title screen will add polish and make your video look more professional.
- Optionally, add music. You can license royalty-free music for use in your video. Minimally, consider adding a 15-second instrumental clip during the beginning and end of your video. I use and recommend Soundstripe, PremiumBeat, and Epidemic Sound. If you do add background music, be sure to also enable ‘ducking’ to automatically reduce the volume of the music whenever there is spoken word present, so the music doesn’t drown out the narration.
- Edit and export the final video. — Time to put all the pieces together! During this stage, combine the voice over, on-screen actions, intro/outro, and background music, then edit as needed.
- Export the final screencast to your video host and share with the world!
5 Pro Tips for Even Better Screencasts
- Hide that desktop!
You’ve probably seen countless videos where the author recorded their entire desktop, including all the folders on their desktop, menubar, and even windows from other applications in the background. Nobody wants to see all that. Temporarily hide all those files and folders scattered around your desktop, or better yet… - Use Full-Screen mode.
If your application supports Full-Screen mode, enter that mode before recording. This will completely hide all those folders and files cluttering your desktop, as well as your menubar.
I use Vivaldi (or Chrome) for nearly all my screencasts, so I also hide the address bar, tabs, toolbars, status bar, and bookmarks bar — basically everything other than the main browser window, ensuring the entire recording area is available for my content. No distractions. - Change your screen resolution.
Newer laptops and monitors support very high screen resolutions up to 5120×2880 or even higher. The problem is, your audience will likely not view your video at that same, gorgeous, full-screen resolution. Many people will watch your video on a mobile device. And when your video is viewed at smaller sizes, text and other items in your video may become too tiny to be legible.
One easy way to handle this is to simply change your screen resolution to 1280×720 before recording your screen actions. This is still HD video resolution, but will ensure legibility when your video is viewed on smaller screens (like mobile devices).
EVEN MORE PRO TIP: Set your resolution to 2560×1440, and then zoom the web browser to 200% to mimic the scale and resolution of a 1280×720 monitor. This will ensure that everything on screen is still legible, even on a mobile device. Plus, it has the added benefit of allowing you to zoom in ScreenFlow without pixelation or sacrificing image quality. - Increase the size of your cursor.
Even if you record at 1280×720, your cursor can still appear very tiny, which makes it difficult for your viewers to follow your on-screen motions. On a mobile device, your cursor will look like a gnat!
If you use a Mac, go to: System Preferences > Accessibility > Display and increase the Cursor Size to “Large” before recording. This will make it easier for your viewers to follow your on-screen actions as you move your cursor around the screen. - Install the SmoothScroll extension for Chrome.
It’s disorienting when a video suddenly ‘jumps’ up or down the screen. It’s nearly impossible to follow your on-screen actions. As the presenter, you know that you scrolled down the page, but your viewers are left to wonder what just happened.
The SmoothScroll extension for Chrome slows down your scrolling actions, easing your screen up and down smoothly when you scroll with the mouse wheel or the keyboard. I nearly always use the arrow keys, or Page Up/Down keys to scroll precisely and smoothly to the portion of the screen I wish to highlight. This helps your viewers to easily follow your on-screen actions, plus it adds another degree of professional polish to your final video.
BONUS: How to Create an Animated Intro for Your Screencast
You don’t need to invest in expensive software to create a simple animation (or, ‘bumper’) for the intro and outro of your videos.
Both ScreenFlow and Camtasia include handy editing tools you can use to animate an object (like your logo) by fading and zooming it into frame. Sometimes, that’s all you need… and simple is always best.
You can go one step further and create a more interesting animation including transitions and effects in Apple’s Keynote. You might also use PowerPoint, but it doesn’t contain the same cinematic-quality transitions and effects.
Then, export the animation/presentation as a video file, which you can import into your screencast project.
Export Settings
As I mentioned before, one of the most helpful features in ScreenFlow is the ability to publish directly to YouTube or Vimeo with one click. This eliminates the time-consuming process of exporting, then converting the final video into a suitable format, while guessing at a suitable data rate, final size, or frame rate. Best of all, the final video is of noticeably higher quality when exported directly to the video hosting service.
For years, I exported a ‘Lossless’ video file at full-resolution, then used HandBrake to convert that video file into a more web-friendly format and size.
When manually exporting video files for use on the web, here are the settings I use: H.264 .mp4 file format at 1440p (2560×1440) @ 60fps (5,000 kb datarate)
A Final Note About Video Hosting
A while back, I wrote a detailed article outlining “10 Reasons Why You Should Never Host Your Own Videos.”
Without repeating all those reasons again here, let me simply share my recommendation for hosting video…
Once you’ve created your screencast video, the best way to publish and distribute your video is to upload it to a video hosting service like YouTube, Wistia, or my personal favorite, Vimeo.
Then, you can easily share your video on social networks, or embed your video on your own website and invite folks to watch your video there.
If you want people to find your video via search, YouTube is your best bet. But, if you want to protect your screencast video, for example, for use in a membership site or an online learning portal, then you’ll love Vimeo’s built-in protection features. You can hide your video from the public, then specify the domain or website on which you want your video to be viewable. This protects your content for only the people you want to watch.
Whatever you do, don’t host your videos on your own web server. Use Vimeo instead.
Got questions?
Whether this is the first time you’ve attempted to create a screencast, or you’re a seasoned pro, I hope this article has helped you learn how to create better screencasts that your audience will enjoy watching.
If you’ve got questions, or need a little advice about creating more effective screencast tutorial videos, feel free to reach out. Or, if you prefer, schedule a call and let’s chat!


63 Comments
I’m one of your customers…and just have to say how much I like this post…so helpful. What you said is great, but even *more* great is the demo of those microphones. Comparing them “side by side” like this really makes it possible for me to make a real judgment. Thank you.
Glad to hear you found it helpful, Christian!
Super-nice write-up! I have no interest in podcasting, but I do like audio toys and have cobbled together a little studio for my “guitar playing.”
Why do you like Vimeo Pro over Wistia? I used Wistia and totally loved it.
Thanks for the feedback, Michael!
Wistia’s great, which is why I listed it. But it’s also quite a bit more expensive than Vimeo PRO, and to be honest, I prefer Vimeo’s player UI over Wistia’s.
Still, if you need deep analytics like viewer engagement and history tracking, Wistia’s a solid choice.
Gotcha. I like Wistia’s UI, but if you don’t there’s def. no reason to be paying quite a premium when there are options.
How did you position the mics in the 6 way shootout? I have an Apogee Mic, but am not getting anywhere near the quality of your recording.
All the pics were positioned in the same way: suspended from a RØDE PSA1 boom arm and placed about a hand-width from my mouth. I used the aforementioned DeskMAX acoustic panels by Auralex on either side of the mic(s) while recording. Hope this helps!
I’ve been trying to add decent quality screencasts to my plugin support site and just haven’t been able to come up with something decent. So THIS is the post I have been needing!! Thanks!
Happy you found it helpful, Chad. Thanks for dropping by!
Great stuff Shawn! Especially the Export settings. The manual settings are perfect, just what I needed as I’m using Handbrake. Thanks
so you record complete audio first before video?
That’s right. During the dry run-through, I script any pauses that might be necessary. And, if needed, you can always edit the audio when it’s matched to the screen actions to add more silence here and there.
Awesome write-up Shawn… really helpful as I prepare my first screencast / talk recording for the upcoming Genesis Camp!
Glad you found it helpful and timely, Dave. Thanks for dropping by, and best of luck with your upcoming screencast/talk!
I wanted to add another helpful tip , maybe adding a seperate user on your computer might eliminate all of the junk for instance if you had to browser your computer for files you don’t want people to see your folder hierachy, or like you said the 1001 icons that you might have on your computer. I have a few users, one for me, one for my son and one for training.
Hi, I was convinced to use ScreenFlow but it is for Mac only? Is that possible? Thanks.
That’s right, Jackie. But Camtasia—the other software we recommended above— offers versions for both PC and Mac.
Hope this helps!
Excellent article. Thank you. I have a question. I’d like to do some screencasts that show IOS apps in action, but I want to show two inputs on the resulting video: the app screen capture itself and also a video of the IOS device being used in my hand (simultaneously). For an idea of what I am describing please take a look at this video:
https://www.youtube.com/watch?v=dSpy2Jya6aI
Can I do this with Screenflow? Or would a competitor like Camtasia be better suited? I’ve used neither yet.
Both ScreenFlow and Camtasia will capture video from an attached iOS device. And both apps make it easy to import other footage… like the live footage of your hand holding the device, for example.
BUT, neither of these apps include the ability to split the screen with your screen capture on one half and the live footage on the other. For that, you may need to step up to a more full-featured video editor like Final Cut Pro or something similar.
If the purpose of the live footage is merely to show gestures, you may find that the “touch callouts” accomplish the same purpose. These are basically on-screen indicators that mimic finger gestures, so that your viewers can see what your fingers are doing. These touch callouts can indicate touches, double-taps, swiping, and more.
Hope this helps!
I really appreciate that you have put down your whole process step by step.
Is there a more detailed blog post on that?
Great post Shawn! Thanks for taking the time to share these tips.
I’m following your advice and my project is turning out great thanks to your advice.
Great article – there aren’t many out there on this topic that aren’t “beginner tutorials”. Learned lots.
Thanks,
Kyle
Hey Shawn,
Great article. It’s one of the few out there and so I hope it moves up on Google’s organic searches!!!
Quick question. Maybe not an easy, but basically, it’s this. I’ve got a decent audio interface (Focusrite) and it’s recording my speech in left channel, which is fine. However, when I steer Camtasia to record from my audio interface, the sound quality is not only terrible, but bounces from mono (left) to stereo (both).
How do others take full advantage of the audio interface? The solutions I’ve found so far are absurdly disappointing. Based on what I’ve found, others, INCLUDING Camtasia’s OWN trainers, record the screen and audio separately. They record the audio in audacity, do their editing, and import it over. I and many other don’t have time for that clunky workflow.
At this point, I don’t see another option other than to get a decent USB mic and give up on the audio interface.
Please share with me your thoughts on this. Many thanks in adv.
cheers, dk
Thanks for the feedback, dk.
Man, I wish I could help with the issue you’re describing, but I have no experience with the Focusrite audio interface and Camtasia. I assume you’ve already done so, but I would recommend contacting their support team to see if this is a known issue. I’ve never encountered similar issues with my hardware setup.
FWIW, I also record my audio separately, then import it into ScreenFlow before recording my screen actions. It’s a much more professional workflow that will yield a higher quality finished product. In addition to the reasons I outlined above, recording your audio separately enables you to properly mix and master the audio, which you can’t do within Camtasia (or ScreenFlow).
Wish I could be more help!
Hi dk,
Like Shawn, I record separately. I find that by writing a script, recording screen (NOT audio) while reading from the script, and then doing the voice-over, I can get my best results, fastest.
I then record the voice-over, edit gaffes and gaps in Audition (or Audacity) and drop the audio into Screenflow.
By quickly splitting the video (pressing the t key) Screenflow lets me quickly adjust the speed of the clip to match the voice-over.
Hi Matt, don’t know if you still follow this thread. But if I get you right, this is your process
1. Write script, note down pauses (while waiting for things to happen on screen)
2. Record screen without audio, but reading the script, to get the sync approximately correct
3. Record voice over, remember the pauses noted in the script (why in audacity, and not directly on screen flow, btw?)
4. Bring video and audio in perfect sync by editing
Thanks for the quick reply, Shawn. It’s not just Focusrite, I’d borrowed another audio interface and had similar results. In brief, Camtasia Recorder has really poor audio recording capabilities. So for busy people who want to pull together a quick and dirty, but quality, screencast, we are stuck w/ USB mics.
BTW, I totally agree that recording, mixing, and editing audio outside of Camtasia provides the most polished and professional audio. No disagreement there. I’ve done it and lived it. For those who think audio not important, they are wrong. A smooth and rich sounding audio track are significantly more well received; people enjoy a professional production.
Before I leave, I just want to leave it open to anyone who’s successfully used audio interface directly into Camtasia, please let me know how.
Many thanks, and I look forward to more of your posts.
cheers, dk
Hi Shawn, just wanted to say thanks! I have just started out with my own screencasts. I had been testing lots of styles and workflow management techniques, but your article really did the trick.
Hi there
Which plug ins do you use with Garage band?
Cheers
russ
Hi Russ,
I use PSP Vintage Warmer 2 to add some warmth, FabFilter’s excellent Pro-L limiter, and then the built-in DeEsser, Noise Gate, and Channel EQ plugins.
Hope this helps!
I loved this post. The idea of scripting out and recording the audio separately has saved me an _incredible_ amount of time. Your system for screencasts works really well for me.
The one challenge I’m running into is how to easily sync my audio with my video. I haven’t found a way to start recording my video while simultaneously playing back my audio. Because of that, I always start one after the other which involves me having to manually sync the audio/video.
Any suggestions or how do you workaround that?
Thanks for dropping by, Alex. I’m thrilled to hear you found this post helpful.
When I record in ScreenFlow, I use the countdown feature before recording the screen actions. As it’s counting down from 5, I’m getting ready to start recording, ensuring that the main ScreenFlow window is still active and the audio is cued for playback.
As soon as the countdown hits zero, I hit the spacebar, which begins playing the audio from ScreenFlow. Then, I quickly switch (Command-Tab) to the web browser in which I am recording. Now I’m able to record my onscreen actions in sync with the voice-over.
When I finish recording the screen actions, I drag the new screen recording into the ScreenFlow project, placing it roughly in line with the audio track. Now, I usually find that it’s helpful for the onscreen actions to occur just slightly ahead of the voice-over. So I’ll nudge it to the left just a tad. For me, it’s usually just one or two left-arrows.
Finally, play back the project, and adjust again if necessary.
Does that help?
ahh, yes. it does help to know that’s the technique you use. i’ll try that on this next screencast.
after i posted this comment, i did come up with another strategy that ended up working out really well.
here’s what i did.
1. leave five seconds on the screenflow timeline on the pre-recorded audio track (audio A).
2. tell screenflow to record audio _and_video. once it starts recording, hit play on audio A.
3. record the screen actions as you follow along with audio A.
4. drag the new audio/video track onto the screenflow timeline.
because you told screenflow to record both audio and video, it captured audio A a second time (audio B) along with the video.
5. line up the start of audio A with the start of audio B.
6. play both audio A and B tracks at the same time. use the [ and ] keys to nudge the audio B track until it’s synced with audio A (i.e. when there’s no echo).
7. once you get that position, you can delete the audio B track.
hopefully both our techniques will help future readers.
thanks for sharing!
Hi Alex,
I am just getting into this, but if it’s not too much trouble, would you be able to make a quick video tutorial showing what you mean?
I’d love to understand your steps in a visual/audio way. TIA!
Very useful.
Thanks Shawn 😉
Great post, Shawn.
What suggestions do you have on background music?
Thanks for dropping by, Valera. Excellent question.
I think the addition of background music can help to differentiate your video, give it a more professional polish, and add credibility — all while setting the tone for your content.
The key is finding just the right piece of music… one that doesn’t overpower the voice-over, but sets just the right tone for the subject matter. I’ll often spend an hour or two listening to dozens of samples before deciding on the right piece of background music. It doesn’t help that so much royalty free music is “cheesy” or overly-corporate sounding.
I like the selection of royalty-free music at PremiumBeat.com, but there are dozens of similar sites.
When you add a piece of music to your video project, it’s a good idea to utilize “ducking” — lowering the volume of the music when the primary narration starts, and then lifting the volume again whenever the narration pauses or is finished. You can hear this effect in my own videos, like this one.
Hope this helps, but if you have further questions, feel free to follow up any time!
Shawn, have you had a chance to try the relatively new Capto for Mac? I stumbled upon it when looking to update my version of their Voila screen capture software. It’s pretty inexpensive at $30 but I wonder how it compares feature and interface-wise to ScreenFlow.
Cheers,
Darran.
Disclaimer: I have no affiliation with the Capto/Voila folks
Great article, Shawn! I had one pretty specific question: I have a condenser mic that’s mono going through an M-Audio Fast Track sound card into my Mac. The problem is, when I’ve tried to record on several screencasting apps (ScreenFlow, Screenflick, even Quicktime), all I get is mono sound in the left channel. How do I make it stereo? Is that even a possibility, or do I have to buy a stereo mic?
Great question, Anna!
First off… most high-end mics are monaural. My mic is mono. But I usually record to GarageBand first, and then export in mono — but using BOTH channels. If you’re recording narration directly into ScreenFlow (and one would presume other similar apps), you should have the ability to pan the mono recording to the center, which should play it back evenly in both speakers. See this screenshot: https://cl.ly/jgA4
This forum thread goes into a little more detail: https://feedback.techsmith.com/techsmith/topics/m_audio_fast_track_only_recording_left_side
Hope this helps!
Hi Shawn
What app did you take that screenshot from?
Best
Russ
Hey, Russ. The screenshot was taken from the Audio tab in ScreenFlow. There’s an Audio Mix section where you can find the pan controls.
Schaweet! Thank you.
Awesome, thanks so much!
Shawn,
Thanks so much for this fantastic tutorial screencasts. I need to start creating screencasts for my business, but I was “stuck”. This took my step-by-step through exactly what I need for my set-up. And now I’m excited to start recording my own screencasts. Thanks sooooo much!
Great article Shawn thanks. I tweeted you last week but wanted some clarification on the process of recording audio BEFORE recording on screen behaviour.
I.e. how do you listen whilst recording? Use a 2nd app?
Also, do you use anything to indicate what’s coming next so you’re not just reacting to what you hear? Do you have a 2nd monitor with the script or at maybe bullet points?
Thanks again!
Hi Ant,
Actually, the featured image at the top of this article is my recording setup. I record my narration in GarageBand, edit it, then import it into ScreenFlow.
Then, I play back the audio from ScreenFlow, which usually lives on my primary monitor on the left, while simultaneously recording my screen actions on the right-hand monitor. ScreenFlow allows you to play back the audio while also recording the onscreen actions.
I do often have the script pulled up as well, for reference during the recording. But since I shoot for videos that are only 5 minutes in length, it’s usually easy enough for me to remember what screen actions to perform during the recording.
Hope this helps!
So you can record the screen with ScreenFlow whilst listening to audio on ScreenFlow?
I use Camtasia which does not allow this – maybe that’s the key difference.
Shawn, your article here is the single thing that has helped me wrap my head around all the nitty gritty of making screencasts the most. Everything ‘clicked’ after reading it.
One question: you say to set your monitor resolution to 1280×720. That does result in the best output, by far.
But… if I zoom in at any point (using Screenflow) the screen (especially text) looks blurred. I guess this is because Screenflow is trying to add pixels that weren’t actually recorded.
I’ve tried leaving my monitor at its default 1920×1200 resolution, and instead setting my browser size to 1635×920. It’s still 16:9 and works well. But:
1. I have to shrink it down to Screenflow’s 1280×720 document size;
2. It doesn’t look as crisp as recording at 720p natively.
3. It’s not as easy to read text in the browser.
However, zoomed text doesn’t look as blurry.
I can’t seem to find a good trade-off. Do you have any ideas on this?
Thank you for your time.
Re. my last comment: I think I’ve figured this out.
I simply can’t zoom in and still have crisp text if I record at 1280×720. So I definitely need to record at a higher resolution to be able to do that. I also need to make sure I choose an ‘exact’ 16:9 resolution (integers). 1920×1080 for example.
So I’ve tested recording full screen at 1920×1080, but also zooming the browser to 125%, to make ‘default size’ text a bit more readable. And then when I zoom in to an area of the screen, using a Screenflow video action, I zoom to 100%, so text is super crisp (cos it’s at the resolution it was recorded at). And scaling down to 720p still leaves everything looking pretty good at the ‘default’ size.
This also works better for me too because the app I mainly demo in my screencasts needs a bit more screen real-estate than 1280×720 affords. It’s a good trade-off, for me anyway!
Only posting this here in case anyone else finds it useful.
Hi Dave,
You’re absolutely right. If you record at a monitor resolution of 1280×720, you cannot zoom in ScreenFlow without the text becoming blurry or pixelated. Actually, since I wrote this article, I’ve changed how I record my monitor.
First, I have two 27-inch monitors. I run ScreenFlow on one, and record my browser on the other. Both monitors are set to 2560×1140.
When I record, I still use Chrome in fullscreen mode. Then I zoom the browser to 200%. This mimics the same experience as viewing on a 1280×720 monitor, but essentially doubles the resolution.
Now, my secondary monitor is just an Apple Thunderbolt Display, whereas my primary monitor is a 27″ Retina iMac. If I were to record on my iMac, I would have four times the resolution, due to the high-res Retina display. Then I’d have to zoom my browser to 800%, but that would also create very large video files… unnecessarily so.
So, you’ve arrived at the best strategy. Record in higher resolution, then scale down in ScreenFlow. This gives you plenty of resolution to zoom in ScreenFlow as you like, without getting blurry text.
Rock on!
Brilliant Shawn. Thank you!
Hi, I loved the article! May I ask why did you not mention many of the current video maker software, including iMovie, which comes pre-installed on the Mac and is very easy to use?
Hi Inga,
Thanks for your feedback and your question. While I love and use iMovie for editing short family movies, it does not support screen recording. You can’t record your screen in iMovie, which is what screencasting is all about.
Now, I suppose you could use QuickTime Player to record your screen (File > New Screen Recording), then export the resulting screen recording, and finally import that file into iMovie. But that would result in a lot of extra work and unnecessary steps.
And, you still won’t benefit from the features that purpose-built screencasting software includes for this purpose, including the ability to override your cursor, create callouts, pans and zooms, and export directly to video hosting services like Vimeo.
In short, I’d recommend using the best tool for the job. iMovie is great for editing movies, and you might even start out using it for screencasting. But in short order, you’ll likely want to upgrade to a “proper” screencasting tool like ScreenFlow or Camtasia.
Hope this helps!
Someone asked how would you join audio and video together, I heard of a program called Plural Eyes 4 from redgiant.com. Not sure if you can use it with ScreenFlow 7, but final cut pro is an option. I got the idea after watching DIY Video Guy on Youtube.
http://www.calebwojcik.com/audio/
For sound proofing i have purchased pro sound kit from https://www.audimute.com/
Hi Shawn
Thanks for this walk-through. It is really helpful as I’m just starting out.
Can I ask about capturing hand drawn annotation such as for a maths tutorial. Would you recommend attaching a graphics pad or drawing directly on a normal touch screen laptop. I will be using a surface to run the camtasia software and so could just use that directly. But I’m not sure if that is the best way. Would you recommend any other software for the drawing part or can I draw directly in the camtasia interface?
Thanks again
Dan
Great question, Dan. I have no personal experience with capturing hand-drawn annotation in real-time, but I found this conversation thread that appears to confirm you can do exactly what you’re trying to do: Anyone try using a drawing tablet with Camtasia Studio?
Hope this helps!
Maybe try Videoscribe? Much quicker and easier than drawing it yourself!!
Yes, Videoscribe is quite a handy way to do so 🙂
http://www.pleasetakemyadvice.com/i-just-cannot-draw-animals/
Another way is just to set up the camera above your work surface as shown here (yes, yes, yes, I know I should not be smoking! 😉 )
http://lylechamney.com/a-quickie-biz-jet/
Hi Shawn,
I believed you used to recommend the Shure SM7B mic. Did you fall out of favor with it? Thanks!
Hi Christina,
Yes, I used the excellent Shure SM7B for years. This past year, I switched to the RØDE Procaster instead. In my side-by-side comparison, the Procaster sounded just a bit better on my voice. The Shure SM7B sounded slightly more flat and muddy, by comparison.
Here’s a test recording of the Procaster: https://cl.ly/pESs
And here’s a test recording of the SM7B: https://cl.ly/pCi2
Both mics are very power-hungry, each one requiring about 60db of gain from your pre-amp. But since they’re both dynamic mics, they also both excel equally at rejecting room noise. You can’t go wrong with either one, in my experience. Though it’s worth mentioning that the RØDE Procaster is more than a hundred bucks cheaper. Hope this helps!
Shawn,
Thank you so much for all this very useful information!
And also thank you for the Vimeo Plus discount code! I’m all signed up 🙂
Cheers!
Lyle